Showing posts with label urad lentil. Show all posts

Monday, 14 March 2011

Granary-style gluten-free bagels -high fibre

bagels
I still miss the warm toasty flavour of granary bread when I eat my usual bagels.  I also note that people seem to find it hard to get enough fibre in their diet on a gluten-free diet, presumably because the foods available in the shops are made from highly processed starches.  Here is a lovely and flexible recipe for a seedy high fibre well flavoured-bagel. adjust the quantity of linseeds to suit your own guts - they have a powerful bulking action.

I started with the usual bagel recipe and added a variety of seeds and other flavourings.  I have made this several times, and have varied it each time, so do amend the recipe to include your favourite seeds.  I have made this with mixtures of the ground buckwheat sprouts I grew last week, with quinoa that I rinsed and toasted then ground, with pumpkin and sunflower seeds, and with brown linseed.

Ingredients and method
400ml warm water (avoid highly chlorinated - if you don't filter your water and it smells very chlorinated let it sit a while to let the chlorine disperse)
1-2 tsp of yeast depending on how much of a hurry you are in
1 tsp of date syrup or other sugar

mix these together and let them froth.  I do this even with the instant yeast you can add dry to flour.  I like to see my yeast working before I go any further.
yeasty water

250g urid lentil flour
mix with the yeasty water and leave the covered batter to rise for a couple of hours in a warm place
double in size - see the air holes

30-50g linseeds -(depending on how 'therapeutic' for your bowels you want this bread to be!)
75g pumpkin seed
50g quinoa, buckwheat etc
100g skin-on almonds (substitute with more seeds/quinoa etc if nut intolerant)
mixed seeds

grind these in your blender until as smooth as you want.
ground seeds


Add the seeds and one egg (not essential if egg intolerant) to the dough

Add about 20g date syrup / 2 tbsp (or suitable brown syrup eg treacle, honey etc)
1/4 tsp vanilla (yes - it helps)
1/4 tsp tamarind paste
add seeds and flavourings to dough

Beat dough until mixed.

Add in enough tapioca flour to make a firm but still very slightly damp dough.  If you touch it very lightly some should stick to your fingers.  Beat thoroughly.
slightly too wet

a little dough sticks

Leave to rise.  I put mine to rise in the oven with some hot water in a dish to give a moist atmosphere.  Otherwise cover with a damp cloth or plastic wrap.  As it rises the tapioca flour will absorb more water and the dough will be easy enough to shape with floured hands.

texture of risen dough - see the air holes
Shape into bagels.  Use a light touch so that you dont knock all the air out.  Place on floured tray to rise again.  The dough will feel odd and slightly bouncy.   We like about 100g for each bagel.

shaped bagels
risen bagels

When risen, boil for 30 secs each side, drain and place on baking sheet.  I read somewhere that you should plunge into iced water after this stage, so I tested it, but we preferred the ones that were just drained.

Add seeds on top if wanted.
sesame seeds

Bake in a hot oven (180C) until golden.
texture of finished bagel

These produce a bagel which has an even texture, no cloying texture, toasts well, holds its shape, freezes well, and tastes great.

Cool, freeze until needed if not going to be eaten within two days.


There are a lot of steps in this but mostly the dough does its own work while you get on with other things.  Slow risen doughs are easier to digest, and the timing between each stage isn't critical.  Increase the yeast or warmth (up to but not beyond 40C) to speed the process up. If you can't finish in one day just put the dough at whatever stage it is at in the fridge and carry on the next day.

Friday, 14 January 2011

Energy Bars - gluten free, dairy free

I spent some time trying to make a flapjack without oats, but was disappointed by the texture and appalled by the amount of butter and sugar needed to hold the ingredients together.  I watched nutritionist Ellie Krieger make energy bars on TV and thought her recipe would adapt well with gluten-free ingredients.


energy-bars-recipe/index.html


 She did use oats and wheat flour; here is a version using buckwheat and my usual flour mix of urid lentils (40%), tapioca (40%) and cornmeal (20%).

These bars are sweet without being cloying, hold together well and can be eaten without crumbs getting anywhere and, for the person that said they wanted quiet food to eat in the library, make hardly any noise at all.

Elie wrapped hers in clingfilm and stored them in the freezer so that she always had a wholesome snack to put in her bag when she was in a hurry.  Otherwise, she suggested a week at ambient temperature.


I have tried to produce a complete nutritional breakdown but had to use a combination of pack backs and websources, so data on all the minerals, amino acids etc. are not available.  Actual figures on the vitamins and minerals should be higher.  However, you can see that these little bars are good for protein, fibre, and iron.  They are also packed full of slow-release sugars so will be good for combating hunger for longer.


Ingredients (substitute whatever fruits and nuts you have in your store-cupbard.  Next time I will try cranberries and lemon zest for a sour flavour).

125g pumpkin seeds
125 sunflower seeds
230g apricots
110g blueberries
125g dates
100g whole buckwheat
100g whole almonds
125g flour (gluten-free mine is urid, tapioca and cornmeal)
3 large eggs
1 tsp cinnamon
150g maple syrup

Method
Put all the dry ingredients in a food processor and whizz until it starts forming a paste.  I had to do this in two batches.  You want some of the fruit to pulverise so that it holds the mix together, but some bits to be large enough to notice what you are eating.

Add the egg and maple syrup and stir until evenly mixed.

Place on a greased baking sheet.  I lined mine with baking parchment just to be sure that it wouldn't stick. Press down to make a flat top so that things will hold together.

Bake at 170C fan for about 20 minutes until it just begins to go brown.

Cut into slices while still warm and place on rack to cool.


Nutrition Data

20 slices from batch (I made 40 but regarded two of these as one serving for this calculation).  Percentages are approximate RDA for adult female.

219 calories
Total fat                 10g                15%
Saturated fat            1 g                 6%
Sodium                  14mg              1%
Total carbohydrate 30mg            10%
Dietary fibre            3 g               13%
Sugars                   17g
Protein                    7g                  14%

Vitamin A  6%
Vitamin C 1%
Calicum 4%
Iron 11%

Have a look at  this website for useful help with analysing recipes - www.NutritionData.com


If you want to make these a more complete protein source add some powdered milk as Elie did - I kept these dairy free because I am mildly lactose intolerant.  Being made with nuts and lentils and buckwheat makes them pretty good as they are.

Wednesday, 5 January 2011

cranberry muffins: dairy and gluten-free

inside - bright berries and loose muffin texture
Busy cleaning out the fridge following the post-festivities gluttony.  There is still a lot of cranberry sauce - I like to make too much as it is depressing to serve a tiny portion and terrible to run out.  The vivid colour does a lot to counteract grey skies and low light levels.

What to do, what to do...invent a recipe for for cranberry and chestnut bread? Sounds a bit serious, so I'll try that later. The last of my carrot muffins got used up yesterday at Tolerant Taster's writers party, so I thought I'd try some cranberry muffins.

I found this recipe - very simple    http://www.cranberryrecipes.org/cranberry-muffins.html

and then read up in Alton Brown's 'I'm just here for More Food' baking book, which I am working my way through at the moment.  A bit of both and a bit of well that'll do produced these muffins.


300g flour (my mix is 40%urid lentils, 40% tapioca and 20% cornmeal)
9g / 3tsp baking powder
1 tsp baking soda
pinch salt
1tsp cinnamon
zest of one orange

100g sugar
1/2 cup / 120ml veg oil
3 medium eggs
1 cup / 240ml juice.  I used 3/4 apple and 1/4 orange  (remember - I am tidying the fridge really)


1 cup 240ml cranberry sauce.  I didn't worry about the sugar or water in the cranberry sauce, muffins are quite forgiving.

Mix the dry ingredients together - either whisk, blitz in food mixer or sieve
mix  oil, eggs and sugar together
Mix the wet and dry ingredients together roughly and stir in the cranberries.

raw muffin batter- only just mixed
Put into paper muffin cases or greased muffin tins.  If you aren't very accurate and get some blobs of mixture on the tin just regard that as a way of finding out what a cookie made from the batter would be like.

Bake about 20-22  minutes at 170C fan or 180C.

I find muffins in general freeze well both cooked and raw.  If you freeze them raw you can bake from frozen or let them defrost, just make sure they are cooked all the way through by inserting a thin knife or skewer or using a temperature probe.  The interiors should reach 210F or 100C.

Flip them out onto a cooling rack so that they don't get soggy bottoms


cooked golden muffins

These are quite an interesting muffin, with the sourness of the cranberries and the hit of orange zest.  If you want a milder flavour leave out the zest.  If you are ok with dairy you could swap the fruit juice for plain yogurt.  You could add a bit more cranberries - next time I would put at least another half cup of the cranberry sauce in so that each bite had a cranberry in it.


So I was cleaning the kitchen....but now the sink is full of dirty dishes.  At least the house smells good and the fridge is a bit emptier.

Thursday, 30 December 2010

gluten free vegan Rosemary and Olive Oil Cracker recipe - thin and crisp

Rosemary and Olive Oil gluten free crackers
Two things combined to create these crackers.  A sudden yearning for crackers led to this recipe :
http://www.seriouseats.com/recipes/2010/12/gluten-free-tuesday-easy-homemade-crackers.html . The second thing is my new pasta roller attachment for the food mixer.  


Anyone who has made anything with polymer clay will know that it tends to fracture and is hard to work with until it is kneaded, and a standard way to do this is to put it several times through a pasta roller. As my manual roller is now dedicated to polymer clay I have an electric one, which is such fun and so useful for these stiffer gluten free doughs.  Run a dough for crackers or pasta through a few times and you get a smooth transparent sheet without any real effort.  When you start the dough will tend to shatter and be irritatingly hard to control.  Just gather it up, reform a slab and pass through again, and after five or six passes it will be smooth and stay together and you can get a sheet of dough a meter long it you can hold it one piece.


Of course I didn't follow the recipe, but it did lead to a rosemary and olive oil cracker that is very thin and crunchy and crisp.  I don't yet know how well they will age - I'll add to this post later when I find out.


Ingredients:
100 g flour ( 40%urid, 40%tapioca, 20%cornmeal)
1/2 tsp baking powder (check gluten free)
1/4 tsp chopped rosemary
1/4 tsp sea salt
1 tbsp olive oil
1/4 tsp lemon juice
water to mix to firm dough


cracker ingredients


Method:
Stir all ingredients except water together until evenly mixed.  Add water until you get a dough you can just squeeze together.  It will be a bit tough and hard to shape at this stage.  If you don't have any helpful machinery kneed it until it gets pliable.  I use the pasta roller attachment on my Kenwood mixer.


On the next pass this sheet of dough became three times as long and still all in one piece.  Make thin sheets and either cut to shape in squares and re-roll the trimmings, or just slice the dough into shards with the ragged edges - they taste just as good and look interesting. 


Bake at about 170C far, 180C, for about six minutes until they are just tinged with gold.  Place on rack to cool then store in an air tight jar.  I don't yet know if they will lose their crispness when stored, but a quick reheat will fix that if necessary.  I'll add to the blog when I know.


The crackers have little air bubbles and speckles from the rosemary.  You can of course vary the flavourings any way you like.


Thursday, 9 December 2010

Ravioli

gluten-free egg-free ravioli
I was asked for a description of the ravioli I referred to in a previous post.  I hadn't yet written up how to make ravioli as I wasn't  satisfied with the texture.  Today I was feeling in need of some experimental therapy - I am supposed to be marking essays - so decided to have another go at the ravioli, altering the proportion of the flours I use.

When I used to make fresh pasta with wheat flour I had found that the more egg you used the more succulent the pasta was.  I ended up using Jamie Oliver's recipe rather than Nigella Lawson's.  Up until now I have always used egg when I have made pasta.  However, I realised I had run out of pasta and I was waiting in for a courier so couldn't nip out and get any.

I made some of the tapioca gel I have used in the past when leaving egg out of recipe.  I took 5g of tapioca flour and stirred it into 50ml of cold water, and then cooked it, stirring continuously, until it was a clear gel.
tapioca gel

 I let this cool a bit while I weighed out 50g of urid lentil flour and 60g of tapioca flour, and then I squidged the flour into the gel.  I needed a bit more water to get a dough so just added some until the dough held together nicely.
mix flour into gel

I mixed this thoroughly until the dough was soft and a bit stretchy. Start with a spoon but you will soon need to pulverise it with your hands. The gel is bouncy and resists the flour.  Once you get a smooth dough knead it until it is a bit stretchy. I just held it in both hands and pulled and folded and pulled and folded until I was happy with the texture.

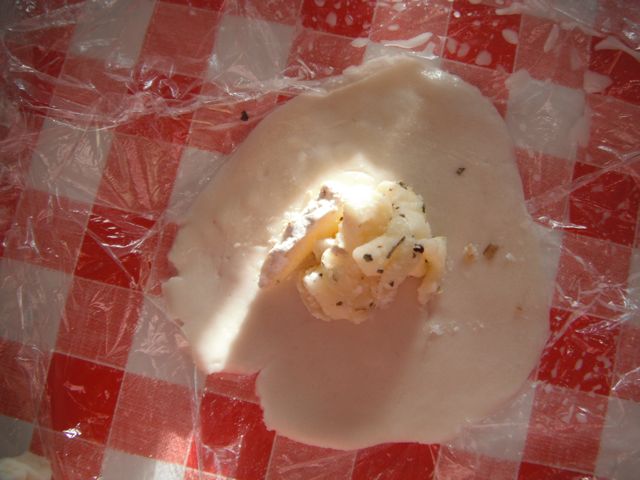
I tried rolling this out but found that the dough tended to stick and then tear when I made ravioli the usual way.  It was much easier to make individual pockets of dough by squeezing a marble of dough in my hand until I had a thin disk, putting the filling in the middle, dampening the edges and then gently sealing them together.

I made a second batch and found that the easiest way to make the ravioli (sorry any Italians out there who think I am using the wrong word for the shape) was to dampen a piece of clingfilm / plastic wrap, place a marble of dough onto this, fold the cling film over and squeeze the dough into the desired shape.  Provided you don't get over excited and make it too thin this gives you a smooth circle of dough for your filling.  Keep the whole thing damp and it wont stick too much and it also means the dough sticks to itself when you press it around the filling.

ball of dough on damp cling film

press out a circle between two layers of damp film

place filling on circle

fold over cling film and use to press edges together

I cooked these for about eight minutes in boiling water.  The length of time you need will depend on how thin and large you make them just as with wheat pasta.

boil in water
These little pasta parcels had a smooth yielding texture and held the filling well.    Enjoy playing with fillings and sauces - the choices are endless.


...............

I froze some of these ravioli and cooked from frozen.  They retain their shape and texture though the filling used went a little rubbery.  Pasta worked fine - need a different filling.

Thursday, 25 November 2010

Update - Chocolate christmas cake - gluten free flour and dairy/dairy-free taste test

On November 19th I posted a trial of the BBC Good Food chocolate Christmas cake, using three different gluten-free flours and dairy/non-dairy fat ( http://bit.ly/9TC6E3).  We just retested the cakes, on Nov 25th, as they have had some time to mature.

The flavours have blended with the extra time and it isn't so much of a shock to have chocolate with fruit lumps.  The textures of the cakes are closer together.  We still liked the one made with my own blend of flour and the butter best.  The Bob's Red Mill flour, from lavidafood.com, made with Pure, was good, so if you want a vegan gluten free cake made from standard flour rather than mixing your own I suggest this is a good choice.

Doves Farm was still producing a fine pasty texture - I think it is the rice in the flour mix.