Cooking and food adventures by Lois Parker: gluten free cooking that brings back that AAHH! moment as your teeth sink into something scrumptious.
Showing posts with label microwave. Show all posts
Saturday, 2 February 2013
almost instant really easy steamed syrup pudding
Winter, river in flood, Wales lost at rugby...it seemed like a good day to have a sweet pudding. I found a steamed syrup pudding recipe made in a microwave, and decided to try it. I used to make steamed puddings in a pressure cooker when I was a student three decades ago, but now I don't even own a pudding basin, muslin, pressure cooker- though I probably could lay my hands on some string and I reckon I could still tie one of those double loop over the top to make a handle arrangements if I tried.
This recipe makes two good helpings or three if you are more restrained.
50g butter - I used soft spread to make creaming quicker
50g sugar
50g self raising flour (made from 40% urid, 40% tapioca, 20% cornmeal, and a rounded tsp of baking powder per 100g flour)
1 egg
1/4 tsp vanilla
3 tbsp Golden Syrup, jam, marmalade...whatever you want on the pudding.
Cream butter and sugar together. Stir in egg and vanilla. Mix in flour.
Put syrup in base of a microwave-safe bowl. Place batter on top of the syrup. Cover bowl with cling film. It will balloon while cooking but don't worry, it turned out fine.
Cook on medium heat in a microwave for five minutes.
When you want to take off the clingfilm I recommend you stab it swiftly with a horizontal knife so that as it collapses the film lands on the knife rather than the pudding.
Serve with custard or eat plain. I found it a bit sweet so sprinkled lemon juice on top, but Rod ate his with custard and gusto. I don't think people would know it had been rustled up in a microwave and took less than ten minutes from having the idea to finding the recipe, making the batter, cooking and serving.
Labels:
celiac,
coeliac,
cornmeal,
easy,
gf,
gluten free,
golden syrup,
lois parker,
microwave,
pudding,
quick,
steamed,
syrup,
tapioca,
urad,
urid
Monday, 26 December 2011
Microwave steam bags - easy way to cook gluten free food safely
The bags allow you to steam a variety of foods in a microwave in very little time. I have been cooking this week with virtually no dishes or pans due to a hiccup in our house moving plans. These bags have allowed me to cook quickly and easily and not have much washing up.
I am using these at home in a gluten free house. It struck me that they would make it easy to cook safely in a contaminated or uncertain environment. Just place your vegetables or other foods in the bags in a clean environment, microwave and tip straight onto your plate. You would need to manage spoilage, keeping foods chilled or frozen if need be. These bags are going to become a regular part of my programme for eating safely.
Tuesday, 14 December 2010
easy gluten-free vegan lasagna
![]() |
| gluten-free vegan lasagna |
I was exasperated the other day that I had to wait in for a courier that never came. I set out to make lasagna but had no eggs, and couldn't go out to buy any.....so here is a vegan version which turns out to be much better than my usual lasagna. This is so much better that I have ordered an electric pasta roller for my Kenwood food mixer so that I can make loads for my sister. I tried rolling the pasta in my old pasta machine, which I have used for polymer clay, and it rolled very easily. I threw that batch away (speckled blue and orange..) but it did at least allow me to be sure that a normal pasta roller would be helpful.
I made the lasagna with tapioca gel and what has now become my standard flour. I put the flour and the gel in the food mixer and let it do all the hard work. When the dough was soft I let it rest, wrapped in plastic, in the fridge for a while, and then rolled it thinly. I tested the wet rolling - between dampened clingfilm, and dry rolling with flour, and found the dry rolling worked fine and made the resulting thin sheets easier to handle.
I then pre-cooked the pasta for a few minutes in boiling water and made two lasagnas. One we ate for lunch, the other has been frozen to see how the lasagna copes with being frozen as a pre-prepared meal.
I also made a tiny lasagna with some of this dough that I had made yesterday, pre-cooked in water and then dried. Layered with a simple tomato sauce and covered in cheese (dough is vegan - use how you want) and baked - it worked very well. The layers of pasta stayed distinct, had a smooth soft texture, and tasted good. The long-term hope is to be able to make neat pre-cooked lasagna sheets so that they can be made in advance and used as a convenience food by people who don't like cooking.
tapioca gel - 10g tapioca flour, 100ml water, stirred together and cooked until clear.
150g flour - 40% urid, 40% tapioca, 20% polenta.
If any UK readers would like to try this flour mix if they would let me know - I'd like to get some feedback from others about this mixture. I think it is better than any of the other flours on the market and doesn't need xanthum gum. I now use it for cakes, pastry, cookies, pasta and bread.
.........................
reheated in microwave from frozen this pasta is still good
Labels:
dairy-free,
egg-free,
frozen,
gluten-free,
lasagna,
microwave,
recipe,
reheat,
special offer,
vegan
Thursday, 9 December 2010
Ravioli
![]() |
| gluten-free egg-free ravioli |
I made some of the tapioca gel I have used in the past when leaving egg out of recipe. I took 5g of tapioca flour and stirred it into 50ml of cold water, and then cooked it, stirring continuously, until it was a clear gel.
![]() |
| tapioca gel |
I let this cool a bit while I weighed out 50g of urid lentil flour and 60g of tapioca flour, and then I squidged the flour into the gel. I needed a bit more water to get a dough so just added some until the dough held together nicely.
![]() |
| mix flour into gel |
I mixed this thoroughly until the dough was soft and a bit stretchy. Start with a spoon but you will soon need to pulverise it with your hands. The gel is bouncy and resists the flour. Once you get a smooth dough knead it until it is a bit stretchy. I just held it in both hands and pulled and folded and pulled and folded until I was happy with the texture.
I tried rolling this out but found that the dough tended to stick and then tear when I made ravioli the usual way. It was much easier to make individual pockets of dough by squeezing a marble of dough in my hand until I had a thin disk, putting the filling in the middle, dampening the edges and then gently sealing them together.
I made a second batch and found that the easiest way to make the ravioli (sorry any Italians out there who think I am using the wrong word for the shape) was to dampen a piece of clingfilm / plastic wrap, place a marble of dough onto this, fold the cling film over and squeeze the dough into the desired shape. Provided you don't get over excited and make it too thin this gives you a smooth circle of dough for your filling. Keep the whole thing damp and it wont stick too much and it also means the dough sticks to itself when you press it around the filling.
![]() |
| ball of dough on damp cling film |
![]() |
| press out a circle between two layers of damp film |
![]() |
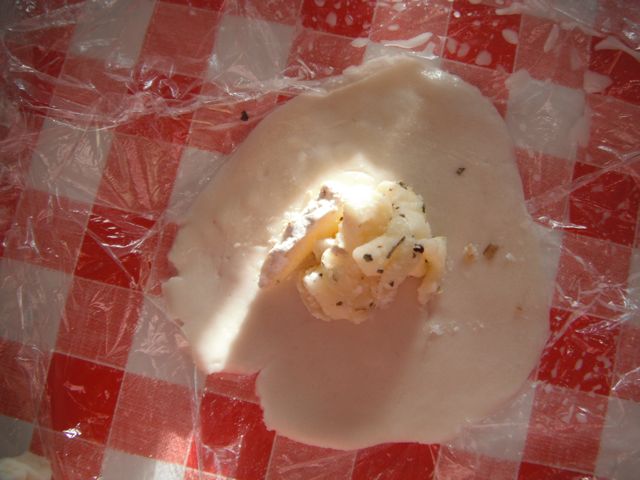
| place filling on circle |
![]() |
| fold over cling film and use to press edges together |
I cooked these for about eight minutes in boiling water. The length of time you need will depend on how thin and large you make them just as with wheat pasta.
![]() |
| boil in water |
...............
I froze some of these ravioli and cooked from frozen. They retain their shape and texture though the filling used went a little rubbery. Pasta worked fine - need a different filling.
Labels:
dairy-free,
frozen,
gluten-free,
microwave,
ravioli,
reheat,
urad lentil,
urid lentil,
vegan
Subscribe to:
Posts (Atom)