Showing posts with label frozen. Show all posts

Wednesday, 2 January 2013

Tesco FreeFrom Cheese and tomato frozen gluten free pizza


I spotted these pizzas in the freezer today while I was picking up Tesco FreeFrom fish fingers. I find making my own pizzas so quick and easy that they take hardly any more time than opening a tin of soup, but was curious to find out what these would be like.

You need to let the pizza thaw for ten minutes before cooking in a hot oven, and then bake for about twelve minutes.  They are done when the cheese melts and begins to go brown.  I added some extra toppings to the pizza before cooking - they don't come with pineapple, pepperoni and olives.

The pizza had plenty of mozzarella cheese on so you get that traditional stringy cheese look when you cut the pizza.  I took lactase pills with my lunch as I would not normally eat anything with much dairy in.


The base held together, wasn't claggy or dry, and would be easy to eat as finger food as well as with knife and fork.  I found it a bit flabby straight out of the oven so put it on a hot griddle for a couple of minutes to crisp it, which gave it a texture I preferred.


The tomato topping is a bit bland.  I presume it has been formulated to please kids, and has no herby taste to me.  I sprinkled mixed Italian herbs on top and Rod squirted barbecue sauce on his slice to give it more flavour.

This pizza was pretty good, and the base a lot better than those in the pantry section that I tried before.  If I was to use them again I would add more flavourings before cooking and start the pizza on my griddle pan and then put in the hot oven the way I do when baking my own pizza.  The dough has several plant gums in to hold it together but not xanthum. It is made from maize flour.

Overall I think this is a good pizza.  You could add any flavourings you like, and so it could suit almost anyone.  It cost £2.50 and could easily feed two or three people.  If three people shared it each would have 270 calories.

Sunday, 15 July 2012

Blueberry frozen yogurt - high fibre!


I have a lot of dried blueberries left over from baking fruit cakes.  I've been experimenting with frozen yogurts, made with milk I pre-treat with lactase to reduce the lactose in yogurt still further.  This fro-yo was made by cooking the blueberries in water until they were soft, blitzing in a blender, sieving and then mixing with the yogurt.  This makes a high-fibre, no added sugar frozen yogurt.

Ingredients
200g dried blueberries
200ml water
500ml yogurt
1 tbsp vodka

agave syrup to taste if needed

Cook the blueberries in the water until they are soft.  Blitz - it will produce a very thick puree.  Sieve to remove the blueberry seeds.  Leave to cool.

Stir the cooled puree into the yogurt with the vodka.  If you don't want to use any alcohol you will need to remember to get the yogurt out of the freezer a few minutes before you want to use it.  The alcohol acts as an anti-freeze, making it scoopable straight from the freezer.  Check the flavour.  If you want it a bit sweeter, add some syrup.  I use agave for its slow release (low GI) qualities.

Icecream guides recommend that you leave the mixture in the fridge for a few hours before putting in the ice-cream machine.  Process until the mixture is thickening and then put in a plastic tub in the freezer.  Remember to label!


Saturday, 30 June 2012

Caramelised apricots and caramel frozen yogurt - lactose free


More adventures with my Channel Island yogurt where I pre-treated the milk with lactase.  This time a simple caramel frozen yogurt, made with a couple of tablespoons of soft brown sugar, cooked gently until it just began changing colour, a desert spoonful of Pineau des Charentes, picked up on a visit to some friends in western France, and a teaspoon of vanilla.  Let the caramel cool before adding the alcohol or it will evaporate, leaving a pleasant taste but not retaining its anti-freeze qualities.  Cool, mix with 500g yogurt and freeze in an ice-cream maker.

I bought some reasonable looking apricots but they were not as sumptuous as I wished - apricots really need to be picked ripe off the tree in the sunshine.  Cut each in half, sprinkle more of the brown sugar in wide pan and place the cut apricots on the sugar.  Cook gently on both sides.  The juice from the apricots will give the caramel sauce a lovely zingy flavour.

Serve with a scoop of the frozen yogurt and a little of the caramel drizzled over.

I only have white crockery - terrible for photographing very pale ice-cream!  I should have put this in a glass and photographed against a coloured background, but I ate my desert before I put the photos on the computer.  Tastes much better than it looks.


Saturday, 12 November 2011

Apple cobbler using frozen topping


I froze cobbler topping in July, thinking this might be an easy way of making a fruit pudding with very little effort.  I froze spoonfuls on a baking sheet, then put them in a plastic bag once they were solid.

Today I made a lot of apple sauce for the freezer, and put some in a baking dish with these cobbler blobs on top.  I sprinkled the whole thing with some demerera sugar and cinnamon and put it in the over at 180C for twenty minutes and then lowered the temperature to 160C for a further fifteen minutes.

The cobbler is fluffy in the middle and crisp on top - an excellent partner to the tart apple base.  This is such an easy way to be able to have a pudding, and the cobbler doesn't take up much room in the freezer.  Being frozen in individual spoonfuls means you can make a one person desert it you want.

Tuesday, 5 July 2011

Pastry - frozen uncooked and used as needed


I froze some of my pastry in little circles, placed between sheets of greaseproof paper.  I rustled up some mini-quiches the other day using these.  I let the pastry discs defrost for a few minutes, so that they would be flexible enough to press into the tartlet tins.  If I had been placing apple slices or brie on top I could have used them frozen.

Into the little tart cases I put some chopped ham, cheese and beaten egg.  Served with salad these made a pleasant lunch.  TT says the pastry tasted and felt the same as if it had been made fresh.

Sunday, 26 June 2011

Deep fried mushrooms - frozen and reheated


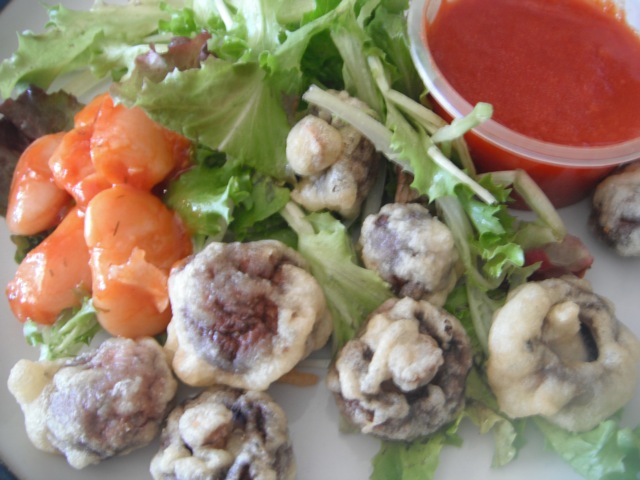
I tested a lot of recipes using the deep fryer. I froze samples of these foods.  The fish and chicken reheated in the oven very well.  I tried the mushrooms today - just gave them a quick blitz in the microwave.  They were surprisingly good, so this is another way to add convenience to your catering.  I expect they would have been crisper in the oven, but the garlicky succulence of the mushroom was very good.

Served them with giant Greek beans, salad and some excellent red pepper sauce, again from the freezer.


Thursday, 28 April 2011

Gluten-free Lasagna sheets - home-made then frozen

lasagna made from sheets of frozen 'fresh' pasta

Some time ago I made lasagna and stored some of the sheets in the freezer.  Yesterday I made these up  for supper.  Some had been frozen direct from making, others had been cooked in boiling water.  I was curious to find out what the best method of freezing lasagna would be so that a single batch of making could be enjoyed as a convenience several times.

The sheets frozen before cooking were easy to handle as they did not stick to the plastic wrap I had stored them in.  I cooked them in boiling water for  a few minutes and layered up with tomato sauce and baked.

The pre-boiled sheets were a nuisance.  As they weren't flat they had stuck into folds of plastic wrap.  It took me longer to get these disentangled than it did to cook the dry sheets.

In future I would freeze the fresh pasta dry and just boil before use.

Both pastas tasted pretty much the same after cooking.  I didn't do a blind testing, but neither I nor TT had any preference.

Tuesday, 14 December 2010

easy gluten-free vegan lasagna

gluten-free vegan lasagna


I was exasperated the other day that I had to wait in for a courier that never came.  I set out to make lasagna but had no eggs, and couldn't go out to buy any.....so here is a vegan version which turns out to be much better than my usual lasagna.  This is so much better that I have ordered an electric pasta roller for my Kenwood food mixer so that I can make loads for my sister.  I tried rolling the pasta in my old pasta machine, which I have used for polymer clay, and it rolled very easily.  I threw that batch away (speckled blue and orange..) but it did at least allow me to be sure that a normal pasta roller would be helpful.

I made the lasagna with tapioca gel and what has now become my standard flour.  I put the flour and the gel in the food mixer and let it do all the hard work.  When the dough was soft I let it rest, wrapped in plastic, in the fridge for a while, and then rolled it thinly.  I tested the wet rolling - between dampened clingfilm, and dry rolling with flour, and found the dry rolling worked fine and made the resulting thin sheets easier to handle.

I then pre-cooked the pasta for a few minutes in boiling water and made two lasagnas.  One we ate for lunch, the other has been frozen to see how the lasagna copes with being frozen as a pre-prepared meal.

I also made a tiny lasagna with some of this dough that I had made yesterday, pre-cooked in water and then dried.  Layered with a simple tomato sauce and covered in cheese (dough is vegan - use how you want) and baked - it worked very well.  The layers of pasta stayed distinct, had a smooth soft texture, and tasted good.  The long-term hope is to be able to make neat pre-cooked lasagna sheets so that they can be made in advance and used as a convenience food by people who don't like cooking.

tapioca gel - 10g tapioca flour, 100ml water, stirred together and cooked until clear.
150g flour - 40% urid, 40% tapioca, 20% polenta.

If any UK readers would like to try this flour mix if they would let me know - I'd like to get some feedback from others about this mixture. I think it is better than any of the other flours on the market and doesn't need xanthum gum.  I now use it for cakes, pastry, cookies, pasta and bread.

.........................

reheated in microwave from frozen this pasta is still good

Thursday, 9 December 2010

Ravioli

gluten-free egg-free ravioli
I was asked for a description of the ravioli I referred to in a previous post.  I hadn't yet written up how to make ravioli as I wasn't  satisfied with the texture.  Today I was feeling in need of some experimental therapy - I am supposed to be marking essays - so decided to have another go at the ravioli, altering the proportion of the flours I use.

When I used to make fresh pasta with wheat flour I had found that the more egg you used the more succulent the pasta was.  I ended up using Jamie Oliver's recipe rather than Nigella Lawson's.  Up until now I have always used egg when I have made pasta.  However, I realised I had run out of pasta and I was waiting in for a courier so couldn't nip out and get any.

I made some of the tapioca gel I have used in the past when leaving egg out of recipe.  I took 5g of tapioca flour and stirred it into 50ml of cold water, and then cooked it, stirring continuously, until it was a clear gel.
tapioca gel

 I let this cool a bit while I weighed out 50g of urid lentil flour and 60g of tapioca flour, and then I squidged the flour into the gel.  I needed a bit more water to get a dough so just added some until the dough held together nicely.
mix flour into gel

I mixed this thoroughly until the dough was soft and a bit stretchy. Start with a spoon but you will soon need to pulverise it with your hands. The gel is bouncy and resists the flour.  Once you get a smooth dough knead it until it is a bit stretchy. I just held it in both hands and pulled and folded and pulled and folded until I was happy with the texture.

I tried rolling this out but found that the dough tended to stick and then tear when I made ravioli the usual way.  It was much easier to make individual pockets of dough by squeezing a marble of dough in my hand until I had a thin disk, putting the filling in the middle, dampening the edges and then gently sealing them together.

I made a second batch and found that the easiest way to make the ravioli (sorry any Italians out there who think I am using the wrong word for the shape) was to dampen a piece of clingfilm / plastic wrap, place a marble of dough onto this, fold the cling film over and squeeze the dough into the desired shape.  Provided you don't get over excited and make it too thin this gives you a smooth circle of dough for your filling.  Keep the whole thing damp and it wont stick too much and it also means the dough sticks to itself when you press it around the filling.

ball of dough on damp cling film

press out a circle between two layers of damp film

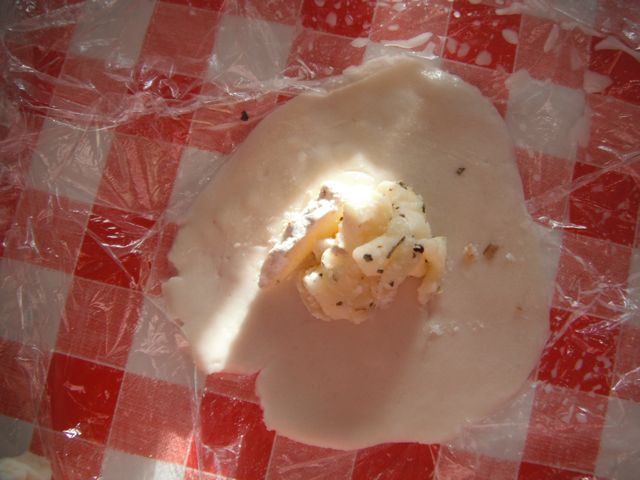
place filling on circle

fold over cling film and use to press edges together

I cooked these for about eight minutes in boiling water.  The length of time you need will depend on how thin and large you make them just as with wheat pasta.

boil in water
These little pasta parcels had a smooth yielding texture and held the filling well.    Enjoy playing with fillings and sauces - the choices are endless.


...............

I froze some of these ravioli and cooked from frozen.  They retain their shape and texture though the filling used went a little rubbery.  Pasta worked fine - need a different filling.